"Go To" :
Check out my ebay store,
Flickr, African Adventures &
even buy crystal/mineral
postage & postcards on
Zazzle!
Check out my ebay store,
Flickr, African Adventures &
even buy crystal/mineral
postage & postcards on
Zazzle!
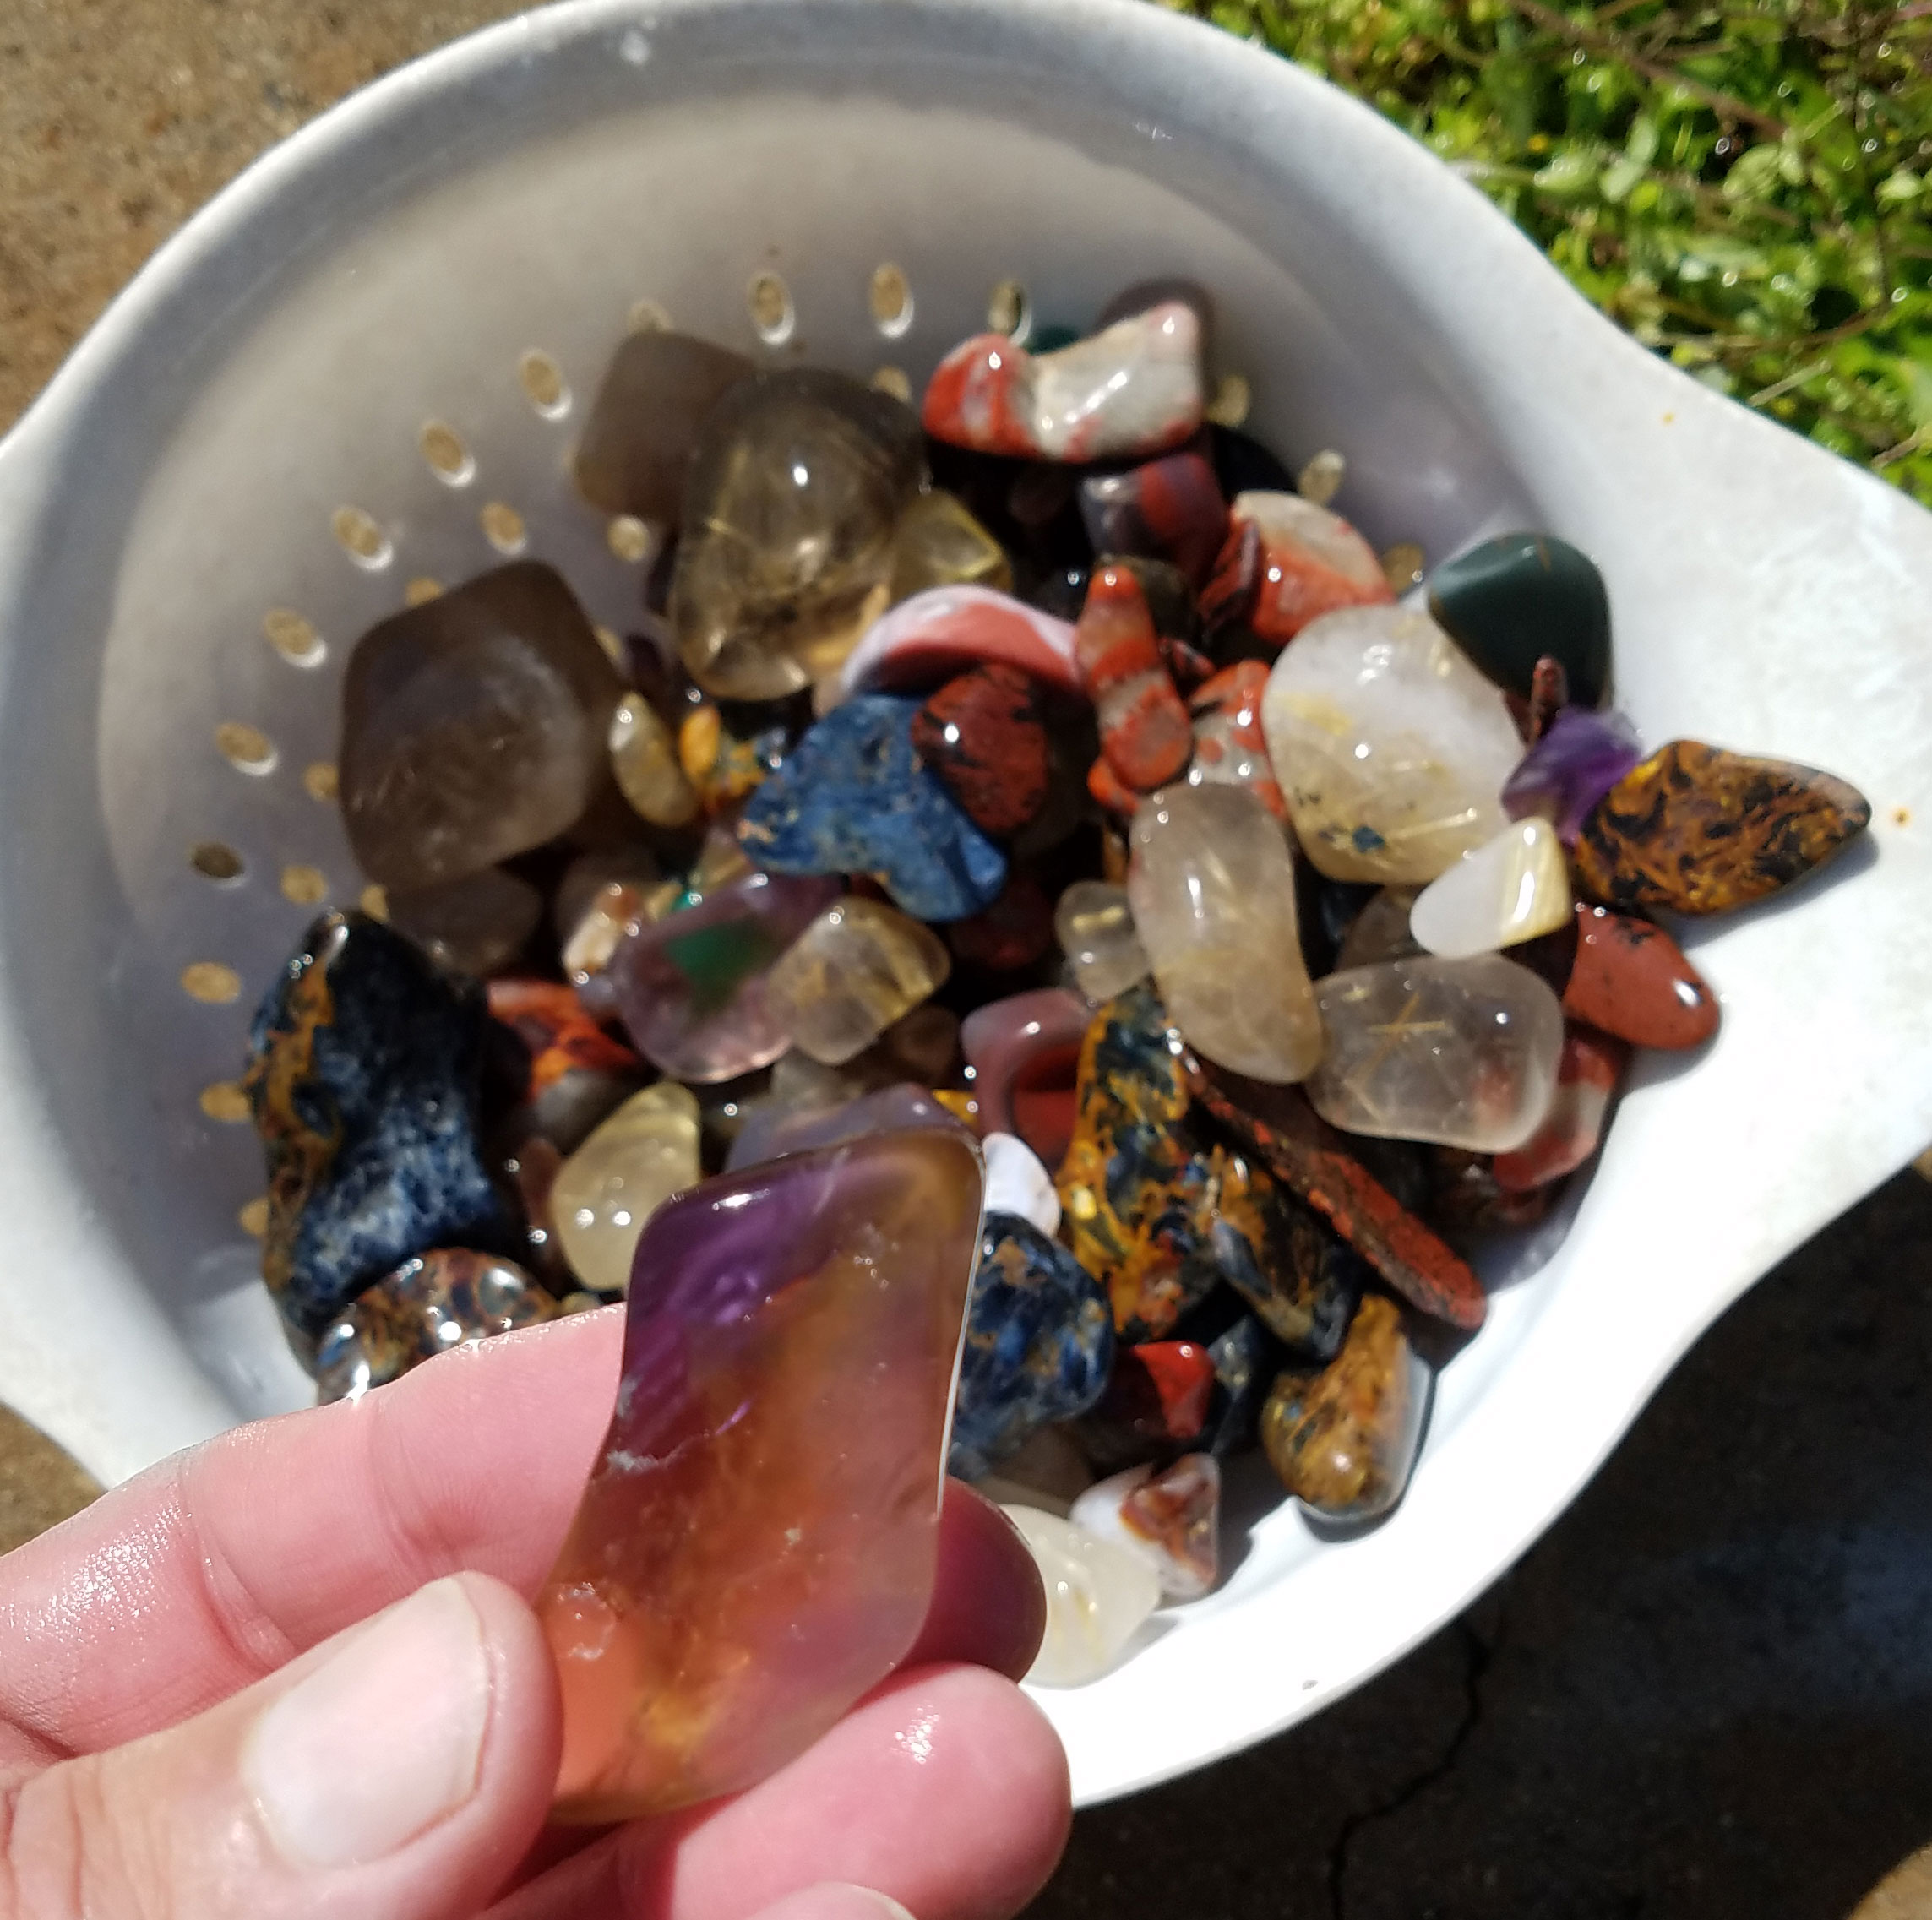
| Tumbling - first stage - 90 grit. Here's what I am currently tumbling in my Lortone Qt-12 Rotary Tumbler: Pietersite, Ametrine, Golden Rutilated quartz, fossilized red horn coral, Dinosaur bone, chrysoprase and a few other random things. I normally tumble the more expensive materials so that I will have something nice for my efforts! Click to enlarge any photo - some expand 2X - huge full screen photos! |
| Helpful navigation tips for our site: REFRESH: We update frequently so be sure to refresh your browser to see any changes. TIME STAMP: On the upper left there is usually a date and time showing when the page was created or updated. CHECK BOTTOM OF PAGE: If you see a recent date, that indicates something new is on the page and often it will be added to the BOTTOM OF THE PAGE. (that's because it is much easier to simply add it to the bottom as compared to moving dozens of photos and text boxes to make room at the top of a page). ENLARGE PHOTOS: Almost all photos will expand when you click on them. Those that have a plus sign when you hover your cursor over the photo can be enlarged even further. YELLOW LINKS: Links are almost always in YELLOW unless I just happen to miss doing that. Otherwise they will be the standard blue color. SITE MAP: It's your friend! I've been adding pages to this site for years and it has become a monster. But, it is a manageable monster. It's easy to get lost and confused and the site map will likely help you find your way back home. Look for site map links on the upper right of most pages. I've also added it to most navigation bars as well as the 'go to' drop-down menu. "GO TO": Almost every page has a 'go to' drop down menu with a link to home, the site map, and most of my other presences on the web such as ebay, flickr, twitter, zazzle, etc. |
Tumbling page 1 - March 2018
Updated May 13, 2018 11:00 AM eastern
New pages added!
Updated May 13, 2018 11:00 AM eastern
New pages added!
Lortone QT-12 tumbler
90 Grit - one pound
Borax (20 Mule Team) - 1 tablespoon
Ivory Bar soap - 1/2 teaspoon
Time - 5 days, then open and add an
extra pound of 90 grit, then 1 week.
Total time - 2 weeks
Types of Rocks in this batch:
Pietersite
Ametrine
Dinosaur Bone
Fossil Red Horn Coral
Rutilated Quartz
Chrysoprase
woodward ranch black plume
chrysoprase
mahogany obsidian
Agate from Australia
These photos show how the stones
look after 2 weeks of being tumbled in
90 grit. All of the rocks are shown wet
and they look frosted when dry.
look after 2 weeks of being tumbled in
90 grit. All of the rocks are shown wet
and they look frosted when dry.
Below: Red Horn Coral
& dinosaur Bone.
& dinosaur Bone.
Below: Ametrine &
Golden Rutilated Quarz.
Golden Rutilated Quarz.
Below: Pietersite
Below: Golden Rutilated Quartz
Below: Black Plume Agate from
Woodward Ranch, Alpine, Texas
Woodward Ranch, Alpine, Texas
Below: Fossil Dinosaur bone.
Colorful minerals have filled the
marrow to reveal a striking pattern.
Colorful minerals have filled the
marrow to reveal a striking pattern.
Below: Pietersite from Namibia
I started out with 90 grit for 5 days. I
then opened the barrel and added an
extra pound and ran for another week.
I then rinsed the rocks off and pulled
out anything that didn't look ready to
advance to the next stage. The next
stage is the medium grit stage of 220.
I pull out any rocks that has porous
areas or that needs to be run through
the rough stage again. Any rock that
has deep pits or is porous may trap
grit and release it later which will
screw things up - maybe a little and
maybe a lot. So I don't take any
chances and pull out anything that isn't
smooth with a good shape and that
has pits. Sometimes I later take a trim
saw and cut out any areas with pits or
porous areas and then run thru the
coarse stage again. On occasion I will
take a hammer and break off problem
areas. Others, I can just put back in
the next stage without doing anything
else.
Below is fossilized / agatized red horn
coral. I really like these!
coral. I really like these!
Above is ametrine from the Anahi mine in Bolivia. It is a
natural combination of amethyst and citrine. These days
it is hard to obtain the rough material as the new mine
operators only sell finished cut material. I was able to
buy a box of rough back in 2007 and the seller told me it
had been in storage for many years.
natural combination of amethyst and citrine. These days
it is hard to obtain the rough material as the new mine
operators only sell finished cut material. I was able to
buy a box of rough back in 2007 and the seller told me it
had been in storage for many years.
Below is pietersite from Namibia.
Below is another view of the colander
full of rocks that have completed the
first stage rough grind in the tumble
polishing process.
full of rocks that have completed the
first stage rough grind in the tumble
polishing process.
| Another view of the batch of gemstones that have completed the rough 90 grit stage and are ready to advance to the next step in the process. The next step is the medium 220 grit grind. Since I use valuable premium material, and since each batch is worth about $400 to $800, I want to insure that only well shaped stones with no pits or deep cracks are advanced to the next stage. Keep in mind that only the first coarse stage affects the shape! Whatever shape you have that you put in the subsequent stages will not change at all. The medium and fine grits don't remove much material and do not change the shape - only a very thin layer of rock and scratches are removed. |
| Since I removed rocks that weren't ready to advance to the next stage, this meant that I had to add material to the barrel to keep it filled to the ideal capacity. There's several things that you can do but it's important to only add material that's at the same stage. I usually have a container of rocks that have already been thru the rough stage but just wasn't nice looking. I kept them to add when needed to bring my barrel level up to optimum levels. In this particular case, I had some small chips of ametrine that I added. I forgot to take pictures at the time though. Since these are small they not only bring the barrel level up, they also act as grit carriers! It's best to have a mix of sizes so that the stones are polished quickly and evenly. If you only have large size rocks they don't grind or polish nearly as quickly as they do when you have small sizes as well. I also add ceramic shapes to buffer the stones and to act as grit and polishing media carriers. As the next page will show - I didn't add enough of these and the quartz variety stones such as rutliated quartz and especially the ametrine had bruising on the edges! |
| I started the first grind stage on Feb. 26 & made this page March 16, 2018. This batch of stones finished up about 6 weeks from the start date! To check out how the stones turned out (Hint: they're great!) then check out my TUMBLING RECIPE RESULTS PAGE |


| Step 1 : Coarse stage. coarse 90 grit - 1 pound. I TableSpoon Borax, ivory soap flakes. Run one week. 12 Pounds of rock. Water to just under last top layer of rocks. 5/8 full. Step 2: Coarse stage continued. Empty out and rinse and add same ingredients as above. Add new rocks as needed to bring barrel to 5/8 full. Run one week. Step 3. Medium Grind stage. Medium 220 grit - 1 pound. Borax and ivory soap flakes. add rocks or ceramic shapes to bring barrel to 5/8 full. Run one week. Step 4. Fine grind stage. Fine 600 grit - 1 pound. Borax and ivory soap flakes. add ceramic shapes or smooth rocks to bring barrel level to 5/8 full. Run 1 week. In this instance, I ran for almost 2 weeks because I didn't have time to advance to the next step. This may have contributed to some of the quartz bruising. Step 5. Polishing stage. Tin oxide 1 1/2 cups. It is very expensive but worth it. 1 TBLSPN Borax and ivory soap flakes. Run one week. I have a separate clean barrel just for polishing so as to be sure that it is not contaminated with grit stuck in the rubber walls of barrell. Step 6. Burnishing stage. Thoroughly clean rocks and add water to TOP of tumbler. Add dawn dish detergent and Tide Free laundry detergent. Run for 30 minutes and not longer. You can tell by how dirty the water is that this really makes a difference! I've read to only use ivory soap for burnishing as it will damage the rubber barrels. I've not noticed any problems using dawn and Tide Free but it may be because I only burnish for 30 minutes or so. I definitely wouldn't try using anything other than those two and not for longer than 30 minutes either. The rubber barrels are expensive (the QT-12 is $85 not counting shipping) so you don't want to risk ruining a barrel! |
| LORTONE QT-12 ROTARY TUMBLER |


| Shown above is the ceramic cylinders that are used to cushion the stones and to act as grit carriers and polish media carriers. These cylinders make sure all surfaces of the stone are exposed to the grinding or polishing media. These act to buffer and cushion the stone and really help with quartz to avoid having bruised edges. These are somewhat expensive but last a good while. I get them, and all of my tumbling supplies from Kingsley North as they have the very best prices on pretty much anything in the lapidary or mineral collecting hobby when it comes to supplies and tools. Shown below is a bag of them that I've saved for polishing. I use the ones in the bag just for polishing to insure that there isn't any grit contamination. These rinse off pretty clean but there is no sense taking any chances and it's just faster to have dedicated ceramic shapes set aside just for polishing. Also shown is a bag of plastic pellets which are also used for the same thing, with a couple of special cautions: you can only use the pellets in one type/size of grit or polish. This is because grit can become embedded in the pellets and cause scratches when you change to the next lower grit size. Personally, I just use them in the polish stage, and not often at that! The plastic pellets can ONLY be used in a rotary tumbler and NOT in a vibratory tumbler. You'll note that in the bag of pellets that there are some small pieces of tumbled stones that I haven't bothered to pick out. Once, I found some pretty valuable brandberg amethyst slices that I had left in this bag! The ceramic shapes last pretty much forever when just used for polishing as they don't wear down. I don't use them in the coarse grind because they would disappear in a rapid and expensive way. I mainly use them in the medium and fine grinds and they do get smaller and smaller. The ones I changed over to "polish only" show how they've decreased from their original size and shape! |


| | |